
If you'd like to read this guide, along with additional guides to specific topics in Snowflake Security, visit our Snowflake Security guide, where you can also download the guide as a PDF e-book.
Snowflake is one of the world’s premier data warehouses and leading SaaS companies in the field of storage. For the many that use Snowflake to store sensitive information, it’s paramount to engage with it according to defined security guidelines in order to detect risky events, prevent as many threats as possible and react to security incidents in the best way possible.
In the following post, I’m going to provide an overview of Snowflake Security and its features as well as a practical guide for using them to their full potential. If interested, I also wrote a similar Redshift security guide and a BigQuery security guide.
Here’s what we’re going to cover:
 In the diagram above, the securable objects are the tables (orders_bu_1, orders_bu_2, orders_bu_3). The ORDER_ENTRY role has INSERT privileges over all orders tables, and on a higher hierarchy, SUPPORT_1 can do that, as well as update the tables of business units 1 & 2.
On the right side, each shipping role has SELECT privileges on the relevant tables, while the SHIPPING_GLOBAL role has access to all warehouses.
The users can either be assigned manually to the different roles, or more realistically defined in an identity management system. As an example, the COO of the company may have both SHIPPING_GLOBAL & SUPPORT_1 roles, meaning that they can do anything both roles can do (though for each query, the COO will need to select the appropriate role).
Note that Snowflake does not support the notion of groups internally, and instead relies on an integration with an identity provider (IDP) using SCIM (System for Cross-domain Identity Management). By using the SCIM 2.0 API, assigning an IDP group to the Snowflake application in the Identity Provider will create a role in Snowflake that includes the users that are under that group in the IDP.
Snowflake offers great flexibility around access control management, as it offers a combination of DAC (Discretionary Access Control) & RBAC (Role Based Access Control). That means that you can set privileges to specific roles (which you can then assign to users or to other roles, by creating a hierarchy). Users also have privileges as creators (owners) of objects.
Whenever a user opens a Snowflake session (whether through the UI, CLI, a tool, or an application using a connector or a driver), it gets assigned with a role according to the following configuration:
In the diagram above, the securable objects are the tables (orders_bu_1, orders_bu_2, orders_bu_3). The ORDER_ENTRY role has INSERT privileges over all orders tables, and on a higher hierarchy, SUPPORT_1 can do that, as well as update the tables of business units 1 & 2.
On the right side, each shipping role has SELECT privileges on the relevant tables, while the SHIPPING_GLOBAL role has access to all warehouses.
The users can either be assigned manually to the different roles, or more realistically defined in an identity management system. As an example, the COO of the company may have both SHIPPING_GLOBAL & SUPPORT_1 roles, meaning that they can do anything both roles can do (though for each query, the COO will need to select the appropriate role).
Note that Snowflake does not support the notion of groups internally, and instead relies on an integration with an identity provider (IDP) using SCIM (System for Cross-domain Identity Management). By using the SCIM 2.0 API, assigning an IDP group to the Snowflake application in the Identity Provider will create a role in Snowflake that includes the users that are under that group in the IDP.
Snowflake offers great flexibility around access control management, as it offers a combination of DAC (Discretionary Access Control) & RBAC (Role Based Access Control). That means that you can set privileges to specific roles (which you can then assign to users or to other roles, by creating a hierarchy). Users also have privileges as creators (owners) of objects.
Whenever a user opens a Snowflake session (whether through the UI, CLI, a tool, or an application using a connector or a driver), it gets assigned with a role according to the following configuration:
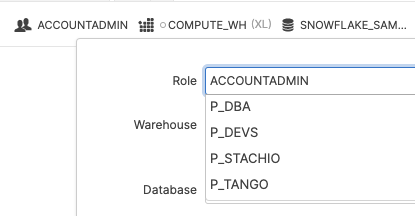
 During the course of a session, users can change the current used role by using the following command:
Alternatively, in the UI, they can also change the current role from the definitions located in the top right corner of the UI:
During the course of a session, users can change the current used role by using the following command:
Alternatively, in the UI, they can also change the current role from the definitions located in the top right corner of the UI:

- Network access control in Snowflake DB
- Managing access across users, roles and groups
- Fine-grained snowflake DB access control
- Access logging & monitoring in Snowflake DB
- Privilege violation logging & monitoring in Snowflake DB
- Identity management integration for federation
- Conclusions
Network access control in Snowflake DB
Snowflake provides out-of-the-box network access control via “network policies”, allowing users to restrict account access to specific IP addresses. The level of granularity can be account-level and user-specific (bear in mind that user settings take precedence when you assign policies for both). You can set lists of IPs or subnets, using CIDR (for example 1.2.3.0/24 to add the entire Class C of 1.2.3.0-1.2.3.255) to be allowed according to a network policy, as well as IPs to be blocked. Network policies per account or per user can either be set from the Web UI or by running SQL commands. In the following example, Ben, our data security engineer, wants to set a new network policy to grant U.S.-based employees access to Snowflake from their office, excluding the guest network:
/* Creating a network policy for employees */
    CREATE OR REPLACE NETWORK POLICY us_employees
    ALLOWED_IP_LIST = ( '1.1.1.0/24', '2.2.2.0/24', '3.3.4.5' )
    BLOCKED_IP_LIST = ( '1.1.1.128', '2.2.2.128' )
    COMMENT = 'US employees offices, excluding guest WiFi gateways';
    /* We now have the new network policy */
    SHOW NETWORK POLICIES;
    /* And here's what the network policy does: */
    DESCRIBE NETWORK POLICY US_EMPLOYEES;
    /* Assigning it to a user */
    ALTER user us_analyst_1 SET NETWORK_POLICY=US_EMPLOYEES;
    SHOW users;
Since Snowflake’s granularity can apply to either the whole account or for specific users, an onboarding script can be used to automatically apply relevant policies to users. Note that network policies currently only support IPv4 addresses (meaning that IPv6 is currently excluded).
Managing access across users, roles and groups
While managing access for enterprises often begins as a simple process, it can quickly escalate in complexity as employees move from project to project, team to team and position to position. Therefore, managing access at scale can develop into an arduous and time-consuming task for those responsible for carrying out these changes (which can mean security teams, IT, data engineering or other teams, depending on the organization). Ideally, a data warehouse should have its data utilized by many teams in the organization in order to drive business and innovation forward. However, usage must always strike the delicate balance between operation and risk. Granting wide access to many teams can raise costs, use up valuable time and pose high risk, especially when third parties are added into the mix. The more data is exposed, the greater the possibility of undesirable outcomes like data breaches, data leaks and exposure of more people to sensitive data. This conflict sits at the heart of data policies.Let’s start with some useful definitions:
- What is a USER in Snowflake DB? A user is an identity entity, either a person or an application, and can be either defined directly in Snowflake or inherited from an identity management solution (such as Okta).
- What is a SECURABLE OBJECT in Snowflake DB? A securable object is any entity (such as a table, view, warehouse, schema or DB) to which you would grant (or deny by not granting) access to specific roles. They are owned by the user that created them.
- What is a PRIVILEGE in Snowflake DB? A privilege is a level of access to a securable object (for example: the privilege of reading from a certain table. Multiple privileges can be granted to a securable object such as the privileges of writing or deleting from a table.
- What is a ROLE in Snowflake DB?A role is an entity to which you can define privileges (for example: grant a role of SUPPORT_GEN with read access from the table `known_issues`). You can then either assign users those privileges, or assign these roles to other roles (which creates a hierarchy of roles).
Sample of roles assignment:
In our example, we deal with the order management aspect of Awesominator Inc. There are three different business units that receive orders. Business units 1 & 2 are handled by one shipping operation (Shipping A) and orders for unit 3 are handled by another (Shipping B). Orders are inserted by an order entry team, which require write-only access to the orders tables. Each shipping operation needs a read-only role to read the orders, while the global warehouse team needs read access across all business unit tables. At the same time, a support team needs to have both the writing permissions of the order entry team and update permissions as well. Even in such a (relatively) simple scenario, we’re very happy to have Hierarchical RBAC, and roles are planned according to the diagram: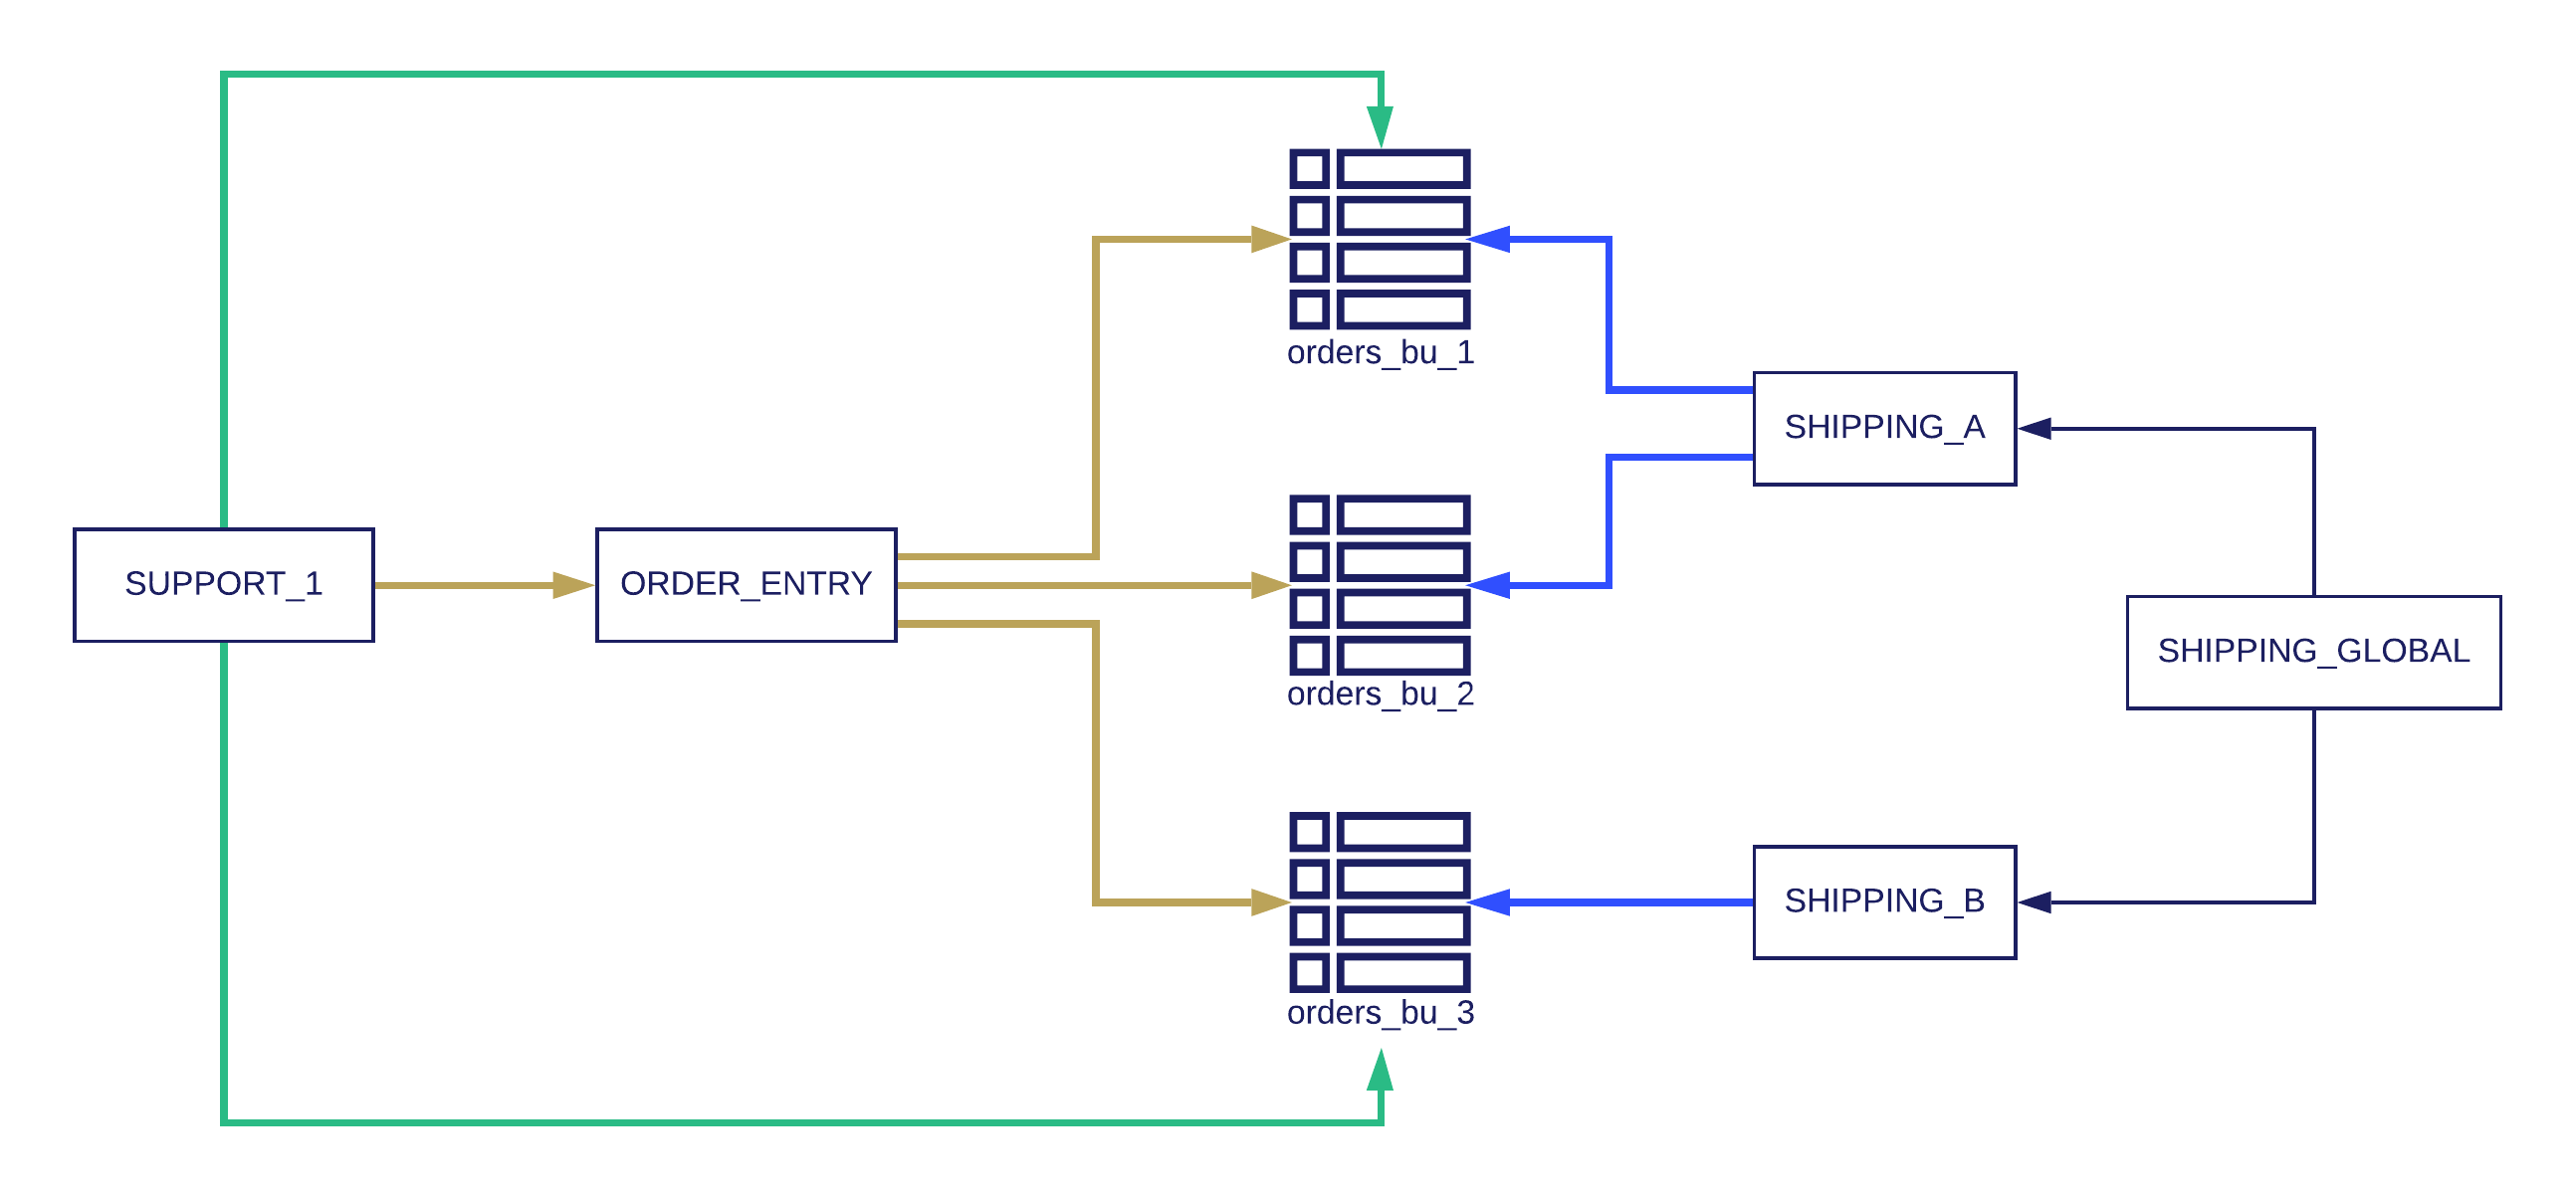 In the diagram above, the securable objects are the tables (orders_bu_1, orders_bu_2, orders_bu_3). The ORDER_ENTRY role has INSERT privileges over all orders tables, and on a higher hierarchy, SUPPORT_1 can do that, as well as update the tables of business units 1 & 2.
On the right side, each shipping role has SELECT privileges on the relevant tables, while the SHIPPING_GLOBAL role has access to all warehouses.
The users can either be assigned manually to the different roles, or more realistically defined in an identity management system. As an example, the COO of the company may have both SHIPPING_GLOBAL & SUPPORT_1 roles, meaning that they can do anything both roles can do (though for each query, the COO will need to select the appropriate role).
Note that Snowflake does not support the notion of groups internally, and instead relies on an integration with an identity provider (IDP) using SCIM (System for Cross-domain Identity Management). By using the SCIM 2.0 API, assigning an IDP group to the Snowflake application in the Identity Provider will create a role in Snowflake that includes the users that are under that group in the IDP.
Snowflake offers great flexibility around access control management, as it offers a combination of DAC (Discretionary Access Control) & RBAC (Role Based Access Control). That means that you can set privileges to specific roles (which you can then assign to users or to other roles, by creating a hierarchy). Users also have privileges as creators (owners) of objects.
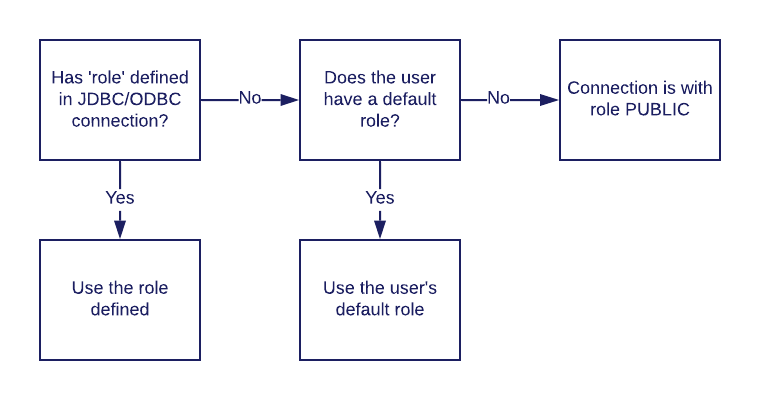
Whenever a user opens a Snowflake session (whether through the UI, CLI, a tool, or an application using a connector or a driver), it gets assigned with a role according to the following configuration:
In the diagram above, the securable objects are the tables (orders_bu_1, orders_bu_2, orders_bu_3). The ORDER_ENTRY role has INSERT privileges over all orders tables, and on a higher hierarchy, SUPPORT_1 can do that, as well as update the tables of business units 1 & 2.
On the right side, each shipping role has SELECT privileges on the relevant tables, while the SHIPPING_GLOBAL role has access to all warehouses.
The users can either be assigned manually to the different roles, or more realistically defined in an identity management system. As an example, the COO of the company may have both SHIPPING_GLOBAL & SUPPORT_1 roles, meaning that they can do anything both roles can do (though for each query, the COO will need to select the appropriate role).
Note that Snowflake does not support the notion of groups internally, and instead relies on an integration with an identity provider (IDP) using SCIM (System for Cross-domain Identity Management). By using the SCIM 2.0 API, assigning an IDP group to the Snowflake application in the Identity Provider will create a role in Snowflake that includes the users that are under that group in the IDP.
Snowflake offers great flexibility around access control management, as it offers a combination of DAC (Discretionary Access Control) & RBAC (Role Based Access Control). That means that you can set privileges to specific roles (which you can then assign to users or to other roles, by creating a hierarchy). Users also have privileges as creators (owners) of objects.
Whenever a user opens a Snowflake session (whether through the UI, CLI, a tool, or an application using a connector or a driver), it gets assigned with a role according to the following configuration:
- If the connection has the parameter role defined in the JDBC/ODBC connection, this will be the default role used (assuming the user was actually granted this role).
- Otherwise, if a default role is configured for the user, it will be set.
- If both do not exist, the user will be assigned to the PUBLIC role.
 During the course of a session, users can change the current used role by using the following command:
USE ROLE <rolename>;
How to set privileges in snowflake?
Finally, assigning our structure is done in SQL commands, as shown below:CREATE DATABASE IF NOT EXISTS Awesomeinator; USE Awesomeinator; // create the securable objects (tables). In reality we will have slightly more columns. CREATE TABLE orders_bu_1 (order_id number); CREATE TABLE orders_bu_2 (order_id number); CREATE TABLE orders_bu_3 (order_id number); // Creating the basic roles: CREATE ROLE ORDER_ENTRY; CREATE ROLE SHIPPING_A; CREATE ROLE SHIPPING_B; // Creating the higher hierarchy roles: CREATE ROLE SUPPORT_1; CREATE ROLE SHIPPING_GLOBAL; // Granting privileges for the different roles: GRANT INSERT ON ALL TABLES IN DATABASE Awesomeinator TO ROLE ORDER_ENTRY; GRANT SELECT ON orders_bu_1 TO ROLE SHIPPING_A; GRANT SELECT ON orders_bu_2 TO ROLE SHIPPING_A; GRANT SELECT ON orders_bu_3 TO ROLE SHIPPING_B; // Adding hierarchy in our shipping: GRANT ROLE SHIPPING_A to ROLE SHIPPING_GLOBAL; GRANT ROLE SHIPPINGE_B to ROLE SHIPPING_GLOBAL; // Finally, adding the almighty support role (Anything order entry can do and then some): GRANT ROLE ORDER_ENTRY TO ROLE SUPPORT_1; GRANT UPDATE ON ALL TABLES IN DATABASE Awesomeinator TO ROLE SUPPORT_1;
Fine-grained snowflake DB access control
Within the regular permissions model of Snowflake, the most granular securable object is a table (or a view). Within the model itself, there is no column-based access control or row-based access control. More granular access control can be enforced by using secure views. Note that using secure views has a performance impact on your queries, as it eliminates some of the optimizations done in access to other securable objects (such as tables or “normal” views). In addition, using secure views to enforce finer-grained access control can be difficult to create and maintain for complex environments.What are Snowflake secure views anyway?
Secure views add two security features over “normal” views:- Users who do not own the secure views can’t view its definition via the SHOW VIEW command.
- Secure views do not use optimizations, to prevent exposing the underlying data which may expose the underlying data which can give users answers about data outside the view’s restrictions.
How to apply Snowflake DB secure views to enforce column level access control
Let’s get back to Awesominator Inc., where the privacy officer wants to limit order details to those relevant to the shipping users, disallowing them from seeing the sensitive `id_num` column:// We create a secure view to show only relevant details, without the sensitive information: CREATE SECURE VIEW view_orders_bu_1 AS (SELECT order_id, customer_name, address FROM orders_bu_1); CREATE SECURE VIEW view_orders_bu_2 AS (SELECT order_id, customer_name, address FROM orders_bu_2); CREATE SECURE VIEW view_orders_bu_3 AS (SELECT order_id, customer_name, address FROM orders_bu_3); // Checking what privileges we have: SHOW GRANTS TO ROLE SHIPPING_A; // Revoking the privileges directly to the tables REVOKE SELECT ON ALL TABLES IN DATABASE awesomeinator FROM ROLE SHIPPING_A; REVOKE SELECT ON ALL TABLES IN DATABASE awesomeinator FROM ROLE SHIPPING_B; // Checking what privileges we have now: SHOW GRANTS TO ROLE SHIPPING_A; // Finally, giving privileges to the views, blocking access from the sensitive information GRANT SELECT ON view_orders_bu_1 TO ROLE SHIPPING_A; GRANT SELECT ON view_orders_bu_2 TO ROLE SHIPPING_A; GRANT SELECT ON view_orders_bu_3 TO ROLE SHIPPING_B; // Checking what privileges we have now: SHOW GRANTS TO ROLE SHIPPING_A; SHOW GRANTS TO ROLE SHIPPING_B; // Note we do not need to do anything with the global shipping account due to the role hierarchy SHOW GRANTS TO ROLE SHIPPING_GLOBAL;
Access logging & monitoring in Snowflake DB
When maintaining an effective security environment, it’s important to not only prevent threats, but also be aware of them; Even if you’re blocking a certain problem, you may still want to take additional measures. You will want to know when there are unsuccessful attempts to establish a Snowflake session, as they may indicate either a misconfiguration in one of your applications (which may cause unpredictable results) or a malicious attack. Failed access attempts are retrieved via the LOGIN_HISTORY (for all users) or LOGIN_HISTORY_BY_USER (for a specific user) table functions. These table functions return a table of the login attempts attempted by different users, including useful information such as the IP address of the connecting user, the tool reported by the user’s driver (was it the Web UI? A Javascript driver? etc) and more.How do you get all failed snowflake logins (failed connection sessions)?
WITH access_attempts AS (
SELECT *
FROM TABLE(INFORMATION_SCHEMA.LOGIN_HISTORY(result_limit=>10000))
ORDER BY event_timestamp)
SELECT * FROM access_attempts
WHERE IS_SUCCESS='NO';
Privilege violation logging & monitoring in Snowflake DB
Failed query attempts (for example: when a user tries to access a forbidden securable object) can be retrieved by the QUERY_HISTORY or QUERY_HISTORY_BY_USER commands. You can then filter the results by the ERROR_CODE or ERROR_MESSAGE columns. More on query logs here. Note that if you want to verify which users are accessing a specific resource you would like to restrict, you will need to parse the SQL Queries carried out to determine if those certain objects were accessed.How can you log access violations in snowflake DB?
// change test to your user
GRANT ROLE ORDER_ENTRY TO USER test;
USE ROLE ORDER_ENTRY;
SELECT * FROM orders_bu_1;
// Getting the expected error:
// SQL compilation error: Object 'ORDERS_BU_1' does not exist or not authorized.
// Checking a different, non-existent object:
SELECT * FROM non_existent_object;
// Getting the same error:
// SQL compilation error: Object 'ORDERS_BU_1' does not exist or not authorized.
// Getting back to our admin role:
USE ROLE ACCOUNTADMIN;
// Pulling the latest queries in history:
SELECT *
FROM TABLE(INFORMATION_SCHEMA.QUERY_HISTORY())
ORDER BY start_time DESC LIMIT 100;