In today’s ever-evolving digital age, data masking is one of the most essential features of data security and privacy. It’s the act of redacting and obfuscating sensitive information that’s being shared internally or externally to maintain optimal functionality while reducing the risk of exposing sensitive data within an organization. Overall, administrators are able to seamlessly allow access to some users, and restrict it for others to maintain security control and reduce risk.
Motivations Behind Data Masking
There are several reasons why someone would want to opt for data masking. In many cases, there is more than one type of motivation behind a data masking project. Some of those underlying reasons include:
- Business Oriented: This is when either the data owners, data governance, or another team decides that exposing certain data can have negative consequences. An example to that is masking of financial data from teams who shouldn’t be exposed to this data, as it could induce business risks.
- Compliance Oriented:The primary drivers of compliance based data masking initiatives are usually data governance, GRC, compliance teams, and in some cases, security teams. These masking projects are done to ensure that the organization complies with certain security frameworks, such as NIST Cybersecurity Framework.
- Security Oriented: This motivation for data masking stems from security teams. The goal here is to reduce risks, mainly ones involving data leaks.
- Privacy Oriented: This is usually a motive pushed by the privacy office or legal teams, and it is powered due to privacy regulations or privacy risks. An example would be the masking of PII, or masking according to specific privacy requirements.
How Do You Mask Data In Snowflake?
When you have a Snowflake data warehouse, it is common for organizations to require anonymized data, as some data consumers only need partial access to the data. For instance, let’s consider a typical healthcare organization using Snowflake as its data warehouse. If we have a table with the treatments provided to patients, we may have the following data consumers:
- Medical professionals using a medical application who need the exact treatment information, but don’t need to know things like the patient’s home address, insurance plan, SSO, or financial details.
- A finance team who may need to know the financial data, but not the exact people it pertains to.
- An accounting team who may need to know contact details as well as charges, but not the medical details.
- Data scientists who need to know statistical information, but not personal information.
With that being said, there are several ways to do that in Snowflake, and we’ll review each one in detail:
- Snowflake Dynamic Data Masking
- Snowflake Data Masking using Views
- Snowflake Static Masking
- Satori Universal Masking
Snowflake Dynamic Data Masking
For starters, let's approach this with a relatively new way to mask data in Snowflake, which is the Dynamic Data Masking feature (available for the Enterprise plan). Dynamic Data Masking allows you to set data masking policies, and apply them on certain columns.
When setting dynamic data masking in Snowflake, you are defining masking policies, which may give different results for columns generally based on the user’s role (in most cases). For example, a policy can be:
From here, you can apply the dynamic masking policies on any column:
For some more support, think of dynamic masking as an abstraction of Snowflake Secure Views, which creates a more reusable way to apply policies. This is all an effort that makes them easier to manage and scale.
Snowflake Data Masking Using Views
Now, let’s say that you don't have an enterprise Snowflake account for some reason or another. If this is the case for you, or maybe you have other logic you want to include in the same abstraction layer, you still have options here. For instance, you can write your own custom dynamic data masking logic within views. As an example, let’s say that we have the following table:
If you want to apply dynamic data masking that will give your ACCOUNTING team full read access, your ANALYST team hashed data for statistical purposes, and others redacted data, you can create a view abstract, such as:
By revoking access from the underlying asset (customers) and granting access to the view (v_customers), users will now have data masking per their roles and can only retrieve data based on the commands in place.
Snowflake Static Masking
Another option for masking data in Snowflake is to statically mask the data per use-case. That means if we have a customers table, and we have several data access scenarios, we generate a version for each use-case. We can do this by creating new objects that contain the data anonymized per use-case, such as:
- We create a customers table in the accounting database which contains all details that the accounting team needs.
- We create a customers’ table in the analysts database with hashed and redacted values.
- And so on for other teams
We perform these data transformations as ETLs, and the main advantage of doing so is creating a very clear separation between the different roles, and the data they may view. You can also take a hybrid approach by building a view for each role, if that aligns with your terms of maintainability.
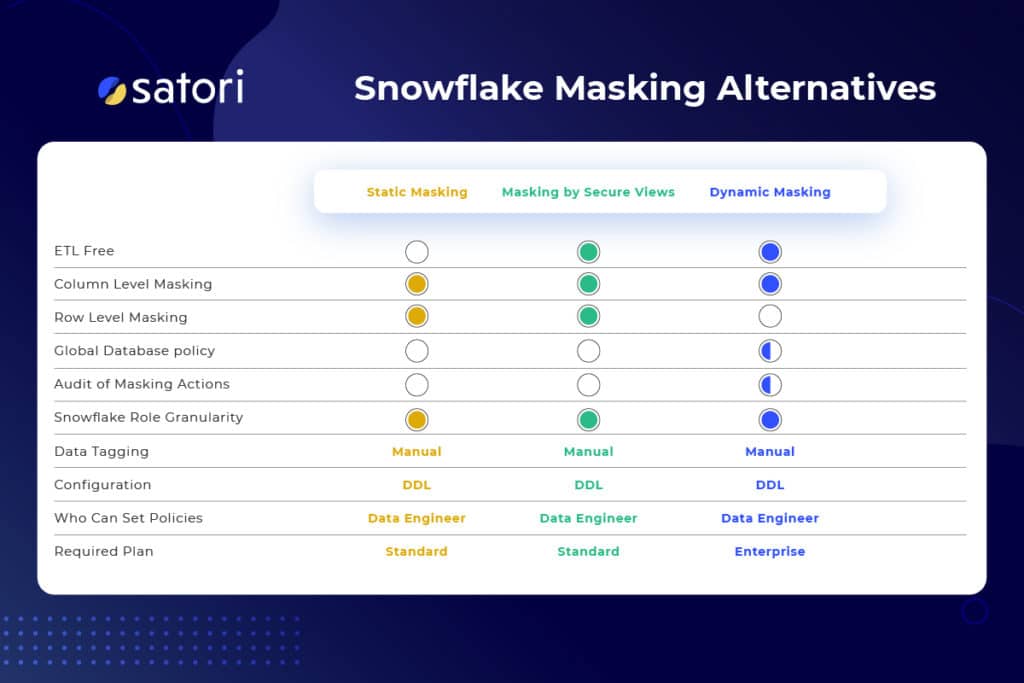
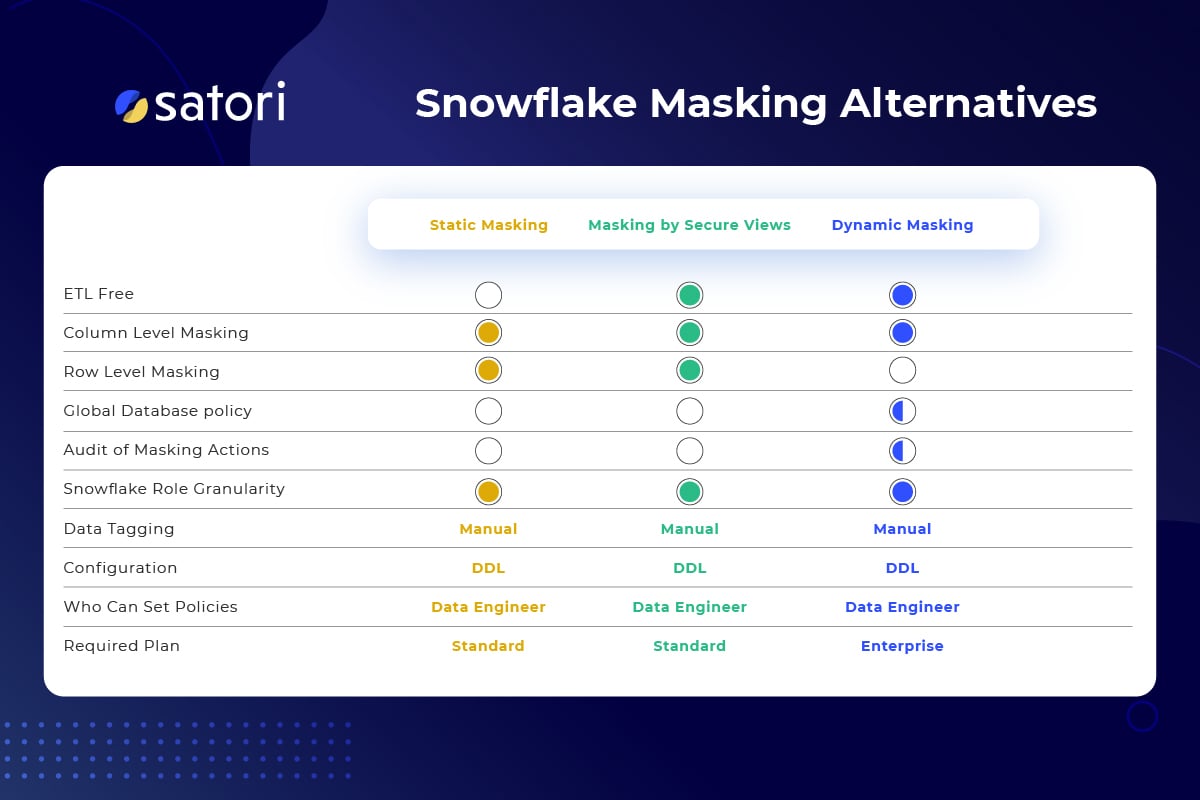
Snowflake data masking options comparison
Satori Universal Masking
As a final note, this comprehensive overview would not be complete without mentioning the Universal Masking feature for Snowflake. This is a feature that can be used when your Snowflake is integrated with Satori. In summary, Universal Masking takes a further step into ease of management by allowing you to set complete masking profiles in one central location, and the freedom to apply these masking profiles globally:
- The profiles can be as generic as “mask anything that’s PII”, or as granular as setting a specific action for each data type.
More granular masking conditions:
- You can apply masking based on Snowflake Roles, or directly on IDP Roles.
- You can be as granular as you want to be while setting the policy on specific columns (or even only for specific rows!). In addition, you can also set them on several tables at once, on a complete schema or database, or even on your entire account with one policy.
- You will get transparent details about the actual masking performed in your audit screen.
Read more about dynamic masking in our complete guide to dynamic data masking.
If you’d like to learn more about Satori’s Universal Masking for Snowflake, please schedule a 30 minutes demo, and we’d be happy to show you around.


